 +86 17753100577
 manager@beflooring.com


A Practical 2025 Buyer’s Guide: 5 Factors That Drive Your Laminate Flooring Cost
September 1, 2025
Abstract
An examination of laminate flooring cost in 2025 reveals a multifaceted financial landscape extending well beyond the initial price per square foot. This analysis deconstructs the total investment into five primary constituent factors. The inherent quality of the material, including its core composition and durability rating, establishes the foundational expense. Aesthetic considerations, such as the realism of the design layer and the texture of the surface, introduce further cost variables. The method of installation, whether undertaken by a professional or as a do-it-yourself project, represents a significant portion of the budget, influenced by subfloor conditions and regional labor rates. Furthermore, necessary ancillary items like underlayment and finishing accessories contribute to the final tally. Finally, project-specific variables, including the total area, the removal of existing floors, and geographic market differences, collectively shape the comprehensive financial outlay. A thorough understanding of these interconnected elements is necessary for any homeowner contemplating a laminate flooring installation.
Key Takeaways
- Material quality, specifically the AC rating and core density, is the primary driver of plank price.
- Professional installation adds significantly to the budget but often includes a warranty and ensures longevity.
- Do not overlook the costs of underlayment, trim, and other essential installation accessories.
- Subfloor preparation is a potential hidden expense that can impact your total project budget.
- Your complete laminate flooring cost is a combination of materials, labor, and project-specific needs.
- Waterproof laminate offers greater versatility and protection for a moderately higher initial investment.
- Choosing an experienced laminate flooring manufacturer ensures product quality and long-term value.
Table of Contents
- Factor 1: The Material Itself – Deconstructing the Laminate Plank
- Factor 2: Aesthetics and Design – The Visual Cost
- Factor 3: Installation – The Labor Equation
- Factor 4: The Supporting Cast – Underlayment and Accessories
- Factor 5: The Bigger Picture – Project Scope and Geographic Location
- Frequently Asked Questions About Laminate Flooring Cost
- Final Thoughts on Budgeting Your Flooring Project
- References
Factor 1: The Material Itself – Deconstructing the Laminate Plank
When we begin to consider the cost of a new floor, our minds often jump to a single number: the price per square foot or per square meter. It seems so simple, so direct. Yet, this figure is merely the opening line of a much more intricate story. To truly grasp the economics of laminate flooring, we must first become familiar with the object itself. What are you actually purchasing when you buy a plank of laminate? It is not a single, homogenous material but a sophisticated composite, a layered creation of modern manufacturing. Each layer contributes not only to the floor’s performance but also to its price.
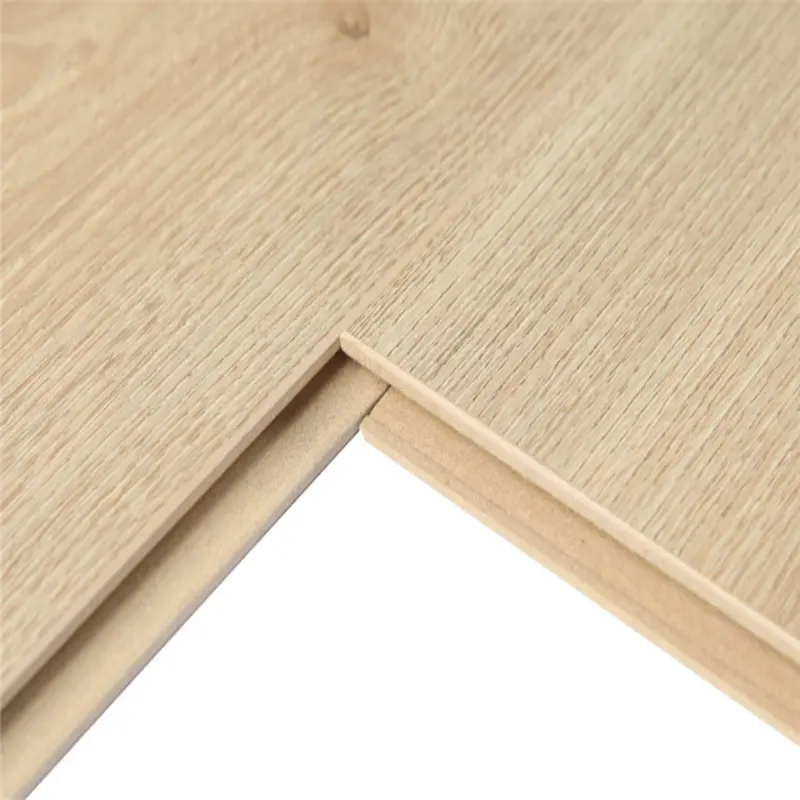
Imagine you are holding a cross-section of a laminate plank. You would see four distinct strata fused together under immense heat and pressure. At the very top is the wear layer, a clear coating of aluminum oxide that stands guard against scratches, stains, and fading. Below it lies the design layer, which is, in essence, a highly detailed photograph that gives the plank its appearance as wood, stone, or ceramic. The thickest part of the plank is the core layer, typically made of high-density fiberboard (HDF), which provides structure and impact resistance. Finally, the backing layer at the bottom offers stability and often some degree of moisture protection. Understanding this layered anatomy is the first step toward deciphering why one plank might cost two dollars per square foot while another costs seven.
What is Laminate Flooring? A Layered Perspective
As we have established, laminate flooring is a synthetic product born from fusing multiple layers together (Flooring Canada, 2025). This construction method is what separates it from solid hardwood, which is milled from a single piece of timber, or luxury vinyl, which is a polymer-based product. The genius of laminate lies in its ability to convincingly mimic natural materials at a more accessible price point.
The wear layer is your floor’s first line of defense. Its thickness and quality are paramount to the floor’s longevity. A thicker, more robust wear layer will naturally command a higher price, but it will also better withstand the daily challenges of dropped keys, sliding furniture, and the pitter-patter of pets’ paws. The design layer, while primarily aesthetic, also influences cost. High-resolution printing and more complex, non-repeating patterns require more advanced technology, which is reflected in the price. The core is the unsung hero, providing the plank’s structural integrity. The final backing layer ensures the plank remains straight and stable, preventing it from warping or cupping over time. Each component is a piece of the cost puzzle.
The Core of the Matter: HDF vs. MDF
At the heart of every laminate plank is its core. This is typically made from wood fibers compressed with resin. The density of this core is a critical, though often overlooked, factor in both performance and cost. You will generally encounter two types: Medium-Density Fiberboard (MDF) and High-Density Fiberboard (HDF).
MDF is less expensive to produce. It is made from smaller wood fibers and is less dense than HDF. While suitable for some light-use applications, it is more susceptible to swelling and damage from moisture and is less resistant to heavy impacts. Think of it as a standard-duty material.
HDF, conversely, is composed of more refined, compacted wood fibers, resulting in a board that is much harder, denser, and more stable. This density makes it significantly more resistant to moisture and impact. For this reason, nearly all high-quality and all waterproof laminate flooring options are built upon an HDF core. The additional manufacturing process to achieve this density increases the material cost, but the return is a floor that is far more durable and suitable for a wider range of environments, including kitchens and entryways. When you see a higher price tag, you are often paying for the superior resilience that an HDF core provides.
AC Rating: Measuring Durability and Traffic
Perhaps the single most important technical specification influencing laminate flooring cost is its Abrasion Class, or AC rating. This is an internationally recognized standard that grades a laminate’s durability. The rating system is beautifully straightforward, ranging from AC1 to AC6. The higher the number, the more durable the floor.
- AC1 (Moderate Residential): Suitable for very light traffic areas like a bedroom or closet.
- AC2 (General Residential): Designed for medium-traffic areas like living rooms or dining rooms.
- AC3 (Heavy Residential / Moderate Commercial): A versatile rating, robust enough for any room in the home and for light commercial use, such as in a small office.
- AC4 (General Commercial): Built to withstand the traffic of a busier commercial setting like a boutique, café, or larger office.
- AC5 (Heavy Commercial): Extremely durable, intended for high-traffic commercial spaces like public buildings, department stores, and showrooms.
- AC6 (Intense Commercial): The highest level of durability, for areas with extreme foot traffic.
As you might predict, there is a direct correlation between the AC rating and the price. An AC1 or AC2 floor will be the most budget-friendly, but its application is limited. An AC5 floor will represent a much larger initial investment. For most homeowners, an AC3 or AC4 rated floor strikes the ideal balance between cost and performance, providing more than enough durability for a busy household. Paying for a higher AC rating is not an extravagance; it is an investment in the floor’s lifespan.
The Rise of Waterproof Laminate: A Game Changer
For many years, laminate flooring’s Achilles’ heel was its vulnerability to water. The wood-fiber core, if exposed to moisture, could swell and warp, causing permanent damage. This relegated laminate to the dry areas of the home, keeping it out of bathrooms, laundry rooms, and sometimes even kitchens. However, technological advancements have radically changed this reality.
Modern high-quality waterproof laminate flooring is now widely available. This innovation is achieved through a combination of an ultra-dense HDF core that is inherently more water-resistant, along with waxed or sealed plank edges and advanced locking mechanisms that create a tight, water-repellent seal at the seams. This allows water to pool on the surface for an extended period without penetrating to the core. As Don Bailey Flooring (2024) notes, these features are essential for ensuring longevity in moisture-prone areas. This evolution has made laminate a viable and attractive option for every room in the house. Naturally, the technology and materials required to produce a waterproof product add to its cost, but for many, the peace of mind and design continuity it affords is well worth the premium.
| Feature | Standard Laminate | Waterproof Laminate |
|---|---|---|
| Core Material | Medium-Density Fiberboard (MDF) or standard HDF | High-Density Fiberboard (HDF) with water-repellent resins |
| Best Use | Bedrooms, living rooms, hallways | Kitchens, bathrooms, basements, any room in the home |
| Avg. Material Cost (per sq. ft.) | $2.00 – $4.00 | $3.50 – $7.00+ |
| Key Advantage | Lower upfront cost | Protection against spills and moisture damage |
| Limitation | Susceptible to water damage | Higher initial investment |
Factor 2: Aesthetics and Design – The Visual Cost
Beyond the structural integrity and durability we have just explored, a significant portion of a laminate floor’s value—both monetary and personal—resides in its appearance. After all, flooring is one of the largest and most impactful design elements in any room. Manufacturers have achieved astounding levels of realism, and this visual fidelity is a key driver of cost. The journey from a basic, repeating wood-look plank to one that is nearly indistinguishable from reclaimed oak involves technology, artistry, and materials that all contribute to the final price.
Think about the difference between a simple photograph and a fine art print. Both depict an image, but the quality of the paper, the richness of the inks, and the resolution of the image itself create a vast difference in experience and value. The same principle applies to the design layer of laminate flooring. The sophistication of the manufacturing process directly translates into the aesthetic quality of the floor under your feet.
The Photographic Layer: Realism at a Price
At its core, the visual identity of a laminate plank is a high-definition photograph of wood, stone, or another material, printed on a special paper that is fused to the core. The cost differential in this layer comes from several sources.
First is the resolution of the image. A sharper, more detailed print simply looks more convincing. It can capture the subtle color variations, grain patterns, and mineral streaks of real wood. Lower-cost laminates might have a slightly blurrier or more pixelated appearance upon close inspection.
Second is pattern repetition. Inexpensive laminates may only have a handful of unique plank designs. This means that over a large area, you will begin to notice the same pattern of knots and grains repeating, which can betray the floor’s artificiality. Premium laminate lines invest in creating a much larger number of unique plank visuals—sometimes 10, 20, or even more. This variation ensures that the final installed floor has a natural, random appearance, much like a real hardwood floor. Developing and printing this wide array of patterns is a more complex and costly process.
Texture and Finish: Embossed in Register (EIR)
Early laminate floors were smooth and flat. While they looked like wood from a distance, they felt uniform and artificial to the touch. This has changed dramatically with the advent of advanced texturing techniques. Today, you can find a variety of surface finishes:
- Smooth/Satin: A simple, low-sheen finish that is easy to clean.
- Matte: A very low-gloss finish that helps hide minor scratches and gives a more contemporary, natural look.
- Hand-Scraped: This texture mimics the look of old, hand-planed wood, with long, irregular grooves. It adds a rustic, artisanal character.
- Wire-Brushed: A more subtle texture that gently accentuates the wood grain by pulling out the softer parts of the grain pattern.
The pinnacle of laminate texturing technology is Embossed in Register (EIR). This is a manufacturing process where the surface texture is precisely aligned with the visual pattern of the design layer. If you see a knot in the wood grain image, you can feel a corresponding knot in the texture. If you see a deep grain line, you can feel a groove in that exact spot. This perfect synchronization between sight and touch creates an astonishingly realistic plank that is difficult to distinguish from real wood. EIR technology requires precise machinery and adds a notable premium to the laminate flooring cost, placing these products at the higher end of the market.
Plank Dimensions: Width, Length, and Thickness
The physical size of the laminate planks also plays a role in their cost. For many years, the standard was a relatively narrow plank, perhaps 5 to 6 inches wide. However, design trends in 2025 lean towards wider and longer planks, which can make a room feel more spacious and luxurious.
- Width: Planks are now commonly available in widths of 7, 8, or even 9 inches or more. Manufacturing these wider planks without compromising stability requires high-quality core materials and precise engineering, which increases the price.
- Length: Similarly, longer planks create fewer seams in the floor, leading to a more elegant and continuous look. These also tend to cost more than standard-length planks.
- Thickness: Laminate flooring thickness is typically measured in millimeters (mm) and usually ranges from 7mm to 12mm, or even 14mm. While thickness is not a direct measure of durability (the AC rating is more important for that), a thicker plank does offer several benefits. It feels more solid and substantial underfoot, closer to the feel of a solid hardwood floor. It can also help to mask minor imperfections in the subfloor and often has better acoustic properties, reducing sound transmission. A 12mm plank will almost always cost more than an 8mm plank of the same design and AC rating.
Exploring Thousands of Floor Colors
The modern laminate market is a testament to choice. Manufacturers now offer an incredible spectrum of designs. You can find everything from the pale, minimalist look of Scandinavian white oak to the deep, rich tones of walnut or ebony. Beyond wood looks, there are convincing replications of slate, travertine, concrete, and even patterned tiles. This vast selection of thousands of floor colors available allows for precise coordination with any interior design scheme. While standard, popular colors like medium oak may be more competitively priced due to high production volumes, more niche or designer–oriented colors and patterns might carry a slight premium. The ability to find the perfect aesthetic for your space is one of the great strengths of laminate flooring.
Factor 3: Installation – The Labor Equation
We have thoroughly investigated the material itself, but purchasing the planks is only part of the financial equation. Getting those planks from the box and onto your floor involves labor, preparation, and expertise, all of which have associated costs. For many projects, the cost of installation can be nearly as much as the cost of the materials themselves. Ignoring this part of the budget is one of the most common mistakes homeowners make, leading to unexpected expenses and project delays.
Let’s approach this like building a house. You can have the finest bricks and lumber, but without a skilled mason and carpenter, you just have a pile of materials. Similarly, a beautiful, durable laminate floor requires a proper installation to realize its full potential in terms of both appearance and lifespan. The choices you make here—whether to hire a professional or tackle the job yourself—and the condition of your home will profoundly impact the total laminate flooring cost.
DIY vs. Professional Installation: A Cost-Benefit Analysis
This is the great crossroads for many homeowners. The allure of saving hundreds or even thousands of dollars by installing the floor yourself is powerful. Is it the right choice for you? Let’s weigh the considerations with a clear head.
Do-It-Yourself (DIY) Installation:
- The Pro: The most obvious benefit is the complete elimination of labor costs. This can cut the project budget by 30-50%.
- The Cons: This path is not without its own costs. You will need to purchase or rent specialized tools, which we will discuss later. More importantly, it requires time, patience, and a fair degree of skill. Mistakes can be costly. A poorly cut plank, an improperly seated seam, or a failure to leave an adequate expansion gap can lead to wasted material or a buckled floor down the road. There is also the “time is money” factor; a project that takes a professional two days might take a novice two weekends.
Professional Installation:
- The Pros: The primary benefit is expertise. A professional installer has the experience to handle tricky cuts, uneven subfloors, and transitions between rooms with ease. They work efficiently and have all the necessary tools. Crucially, most professional installations come with a warranty on the labor. If the floor fails due to an installation error, they are responsible for fixing it. This provides immense peace of mind.
- The Con: The main drawback is, of course, the cost. You are paying for the installer’s skill, time, and business overhead.
The decision rests on an honest assessment of your skills, your available time, and your tolerance for risk. For a small, simple, square room, a DIY installation is very achievable for a handy individual. For a large, complex layout with multiple doorways, stairs, and an imperfect subfloor, the value of a professional becomes much more apparent.
Understanding Labor Costs Per Square Foot
If you opt for professional installation, the cost is typically quoted per square foot or per square meter. This rate can vary dramatically based on several factors. According to 2025 data, you can expect installation labor to range from $2.00 to $5.00 per square foot in the United States, with similar ranges (adjusted for local currency and wages) in Europe and other markets (Ansbro Aldrich Flooring, 2024).
What causes this variation?
- Geographic Location: Labor rates are higher in major metropolitan areas than in rural ones.
- Project Complexity: A simple, empty, rectangular room will be at the low end of the range. A room with lots of angles, a fireplace hearth to cut around, or a set of stairs will be at the high end. Installing on stairs is particularly time-consuming and can be charged at a much higher rate per step.
- Installer’s Business Model: A large flooring retailer may charge more than an independent contractor, but they may also offer more robust warranties and project management.
- Scope of Work: The base installation fee usually only covers laying the planks. Additional services like moving furniture, removing the old flooring, and installing new baseboards will be extra charges. Always get a detailed, itemized quote.
Subfloor Preparation: The Unseen Expense
Here lies the most common source of budget overruns in a flooring project. Laminate flooring, particularly the click-lock type, requires a subfloor that is clean, dry, and, most importantly, flat. Most manufacturers specify that the subfloor must not have variations of more than 3/16 of an inch over a 10-foot span (or a similar metric).
What does this mean for your budget? Before installation can even begin, your subfloor must be assessed.
- If you have low spots, they will need to be filled with a self-leveling compound. This material adds cost, and the labor to apply it adds more.
- If you have high spots (common on concrete slabs), they will need to be ground down.
- If your wooden subfloor has squeaks, loose panels, or water damage, these issues must be repaired first.
- If the subfloor is severely damaged or uneven, you may even need to install a new layer of plywood or underlayment board on top of it.
These preparatory steps are not optional. Laying laminate over an uneven subfloor will cause the locking system to be under constant stress. The planks may separate, squeak, or even break over time, voiding your product warranty. Always factor a contingency of 10-15% into your budget specifically for potential subfloor remediation.
Click-Lock Systems: An Installation Innovation
Fortunately, modern manufacturing has made the installation process itself more efficient. The vast majority of laminate flooring sold today uses a “floating floor” installation method with a “click-lock” or “tongue-and-groove” system. This means the planks are not glued or nailed to the subfloor; they simply connect to each other and float on top of an underlayment pad.
This ingenious system has several benefits that impact cost. It is much faster to install than traditional glue-down or nail-down flooring, which can reduce professional labor time. It also makes DIY installation more feasible for amateurs, as it requires fewer specialized tools and techniques than older methods. This innovation is a key reason why laminate remains a cost-effective flooring solution, as it helps to keep the installation side of the budget in check compared to materials that require more intensive labor, like ceramic tile or nail-down hardwood.
| Cost Component | Low-End Estimate (per 500 sq. ft.) | High-End Estimate (per 500 sq. ft.) | Notes |
|---|---|---|---|
| Laminate Materials | $1,250 ($2.50/sq. ft.) | $3,500 ($7.00/sq. ft.) | Varies with AC rating, thickness, and brand. |
| Underlayment | $150 ($0.30/sq. ft.) | $500 ($1.00/sq. ft.) | Basic foam vs. premium acoustic/moisture barrier. |
| Installation Labor | $1,250 ($2.50/sq. ft.) | $2,500 ($5.00/sq. ft.) | Assumes professional installation; varies by location. |
| Flooring Removal/Disposal | $500 ($1.00/sq. ft.) | $1,000 ($2.00/sq. ft.) | Cost to remove and haul away old carpet, tile, etc. |
| Accessories (Trim, etc.) | $200 | $600 | Includes baseboards, quarter-round, and transitions. |
| Subfloor Prep (Contingency) | $0 | $750+ | Highly variable; may not be needed. |
| Estimated Total | $3,350 | $8,850+ |
Factor 4: The Supporting Cast – Underlayment and Accessories
When budgeting for a new floor, it is human nature to focus on the main event: the planks themselves. They are what you see and touch, the star of the show. However, a successful and long-lasting flooring installation depends on a cast of supporting characters: the underlayment that lies beneath and the trim and accessories that provide the finishing touches. To overlook these elements is to create a budget with a significant hole in it. They are not optional extras; they are integral components of a complete flooring system.
Imagine you are dressing for a formal event. The suit or dress is the centerpiece, but the shoes, the belt, the tie—these are what complete the ensemble and ensure a polished look. In the world of flooring, underlayment and accessories play this same vital role. They provide function, finish, and finesse, and their costs must be accounted for from the very beginning.
The Role of Underlayment: More Than Just a Cushion
Underlayment is a thin layer of foam, felt, cork, or other material that is rolled out onto the subfloor before the laminate is installed. For a floating floor system, it is absolutely essential. Its cost typically ranges from $0.30 to over $1.00 per square foot, and its functions are numerous and critical:
- Moisture Barrier: Perhaps its most important job, especially over concrete subfloors. Concrete is porous and can transmit moisture vapor from the ground. A good underlayment with an integrated vapor barrier prevents this moisture from reaching the wood-based core of the laminate, which would otherwise cause swelling and damage.
- Sound Absorption: Laminate can be noisy underfoot, producing a hollow or “clicking” sound. Underlayment helps to dampen this sound, making the floor quieter to walk on. It also reduces the transmission of sound to the room or floor below, a feature highly valued in apartments and multi-story homes.
- Thermal Insulation: The underlayment provides a modest thermal break, which can make the floor feel slightly warmer to the touch, particularly over a cold concrete slab or an unheated crawlspace.
- Cushioning and Support: It provides a slight amount of cushioning, which can make the floor more comfortable to stand on for long periods. More importantly, it helps to smooth over very minor subfloor imperfections and provides a stable, supportive base for the laminate’s click-lock system.
Some laminate planks come with a pre-attached underlayment pad. While this offers convenience, it is often a very thin, basic pad. For installations over concrete or in situations where sound-dampening is a priority, a separate, higher-quality underlayment is almost always the better choice.
Types of Underlayment and Their Costs
The market offers several types of underlayment, each with a different performance profile and price point:
- Standard Foam: This is the most basic and inexpensive option. It provides minimal cushioning and sound-dampening and is suitable for use over a wood subfloor in a dry, upstairs room. It does not typically include a vapor barrier.
- Combination Foam: A slight step up, this is a standard foam underlayment with a plastic film attached to one side to act as a vapor barrier. This is the minimum requirement for installations over concrete.
- Felt Underlayment: Often made from recycled fibers, felt is a denser and more substantial option. It offers excellent sound absorption and is a popular choice for its acoustic properties.
- Cork Underlayment: A premium choice, cork is a natural, sustainable material that excels at both sound and thermal insulation. It is naturally resistant to mold and mildew. It is also one of the most expensive options but provides superior performance.
Your choice of underlayment should be dictated by your subfloor type and your performance goals. Skimping on the underlayment to save a few hundred dollars is a false economy that can compromise a multi-thousand dollar flooring investment.
Essential Accessories: Baseboards, Transitions, and More
A floor does not end at the wall. The perimeter of the room and the transitions to other flooring types must be finished professionally for the project to look complete. These finishing pieces, often called moldings or trim, are sold by the linear foot and can add a surprising amount to the total bill.
- Baseboards or Skirting: These are installed along the bottom of the wall to cover the expansion gap that must be left around the perimeter of any laminate installation. You can reuse your existing baseboards if they are removed carefully, but often they are damaged in the process or a new, taller profile is desired to complement the new floor. Modern options like waterproof vinyl base boards offer a durable, moisture-resistant choice perfect for pairing with waterproof laminate.
- Quarter-Round or Shoe Molding: If you choose not to replace your baseboards, a small piece of trim called quarter-round is installed along the bottom edge of the baseboard to cover the expansion gap.
- T-Molding: This T-shaped piece is used to bridge the gap between two floors of the same height, typically in a doorway between two rooms that both have the new laminate.
- Reducer: This piece creates a smooth transition between the laminate floor and an adjacent floor of a lower height, such as vinyl or linoleum.
- Stair Nosing: This is a crucial and often expensive piece. It creates a durable and finished edge for the top of a staircase and for each individual stair tread.
These accessories are often available in finishes that are digitally printed to match the laminate floor perfectly. The cost of these items—often several dollars per linear foot—can easily add up to several hundred dollars for an average-sized project.
Tools of the Trade: Costs for the DIYer
If you have chosen the DIY installation path, you must budget for the necessary tools. While a professional has these as part of their business, you will need to acquire them. A basic list of floor tool accessories includes:
- Power Saw: A miter saw is ideal for making clean, straight cuts at the end of rows. A jigsaw or table saw is also needed for making irregular cuts around doorjambs or vents.
- Installation Kit: This usually includes a tapping block (to gently tap planks together without damaging the edges), a pull bar (to tighten the last plank in a row), and expansion spacers (to maintain the gap around the perimeter).
- Tape Measure, Pencil, and Square: For accurate measurements and straight lines.
- Utility Knife: For cutting underlayment.
- Safety Gear: Safety glasses and gloves are non-negotiable.
The cost of these tools can range from under one hundred dollars if you already own a saw, to several hundred dollars if you need to purchase everything new. Renting a power saw can be a cost-effective compromise.
Factor 5: The Bigger Picture – Project Scope and Geographic Location
We have now examined the laminate material in microscopic detail, from its core density to its surface texture. We have accounted for the labor to install it and the accessories needed to finish it. Now, we must zoom out and look at the project through a wide-angle lens. The total laminate flooring cost is not just a sum of its parts; it is also influenced by broader contextual factors. The size of your project, the work required to prepare the space, and even your address on the map all play a significant role in shaping the final number on your invoice.
Thinking about these larger-scale factors from the outset allows for more realistic and comprehensive financial planning. It helps us move from calculating the cost of a single box of flooring to estimating the true, all-in cost of transforming a room, or an entire home.
Economies of Scale: The Impact of Project Size
In economics, “economies of scale” is the principle that the cost per unit of production decreases as the volume of production increases. This concept applies directly to flooring projects.
- Material Costs: While the price per square foot of the laminate itself may not change, purchasing a large quantity for an entire house may make you eligible for a volume discount from the retailer. Shipping costs per unit also tend to decrease with larger orders.
- Labor Costs: This is where the effect is most pronounced. An installer has fixed costs associated with every job: travel time, setup, and cleanup. For a very small project, say a 100-square-foot powder room, these fixed costs make the price per square foot for labor quite high. For a 1,500-square-foot project, these same fixed costs are spread out over a much larger area, bringing the per-square-foot labor rate down. Many installers have a “day rate” or a minimum charge for any job, so it is often more cost-effective to have multiple rooms done at once rather than separately over time.
This does not mean a larger project is “cheaper”—the total bill will obviously be higher. However, the cost per unit of area is often lower, providing better value for your investment.
Old Flooring Removal and Disposal: The Cost of a Fresh Start
Unless you are working in new construction, there is an existing floor that needs to be removed before your new laminate can be installed. This is a labor-intensive task that adds a distinct line item to your budget. The cost for removal and disposal can range from $0.50 to over $2.00 per square foot, depending on the material being removed.
- Carpet: This is generally the easiest and least expensive to remove. The carpet and pad are cut into strips, rolled up, and the tack strips around the perimeter are pried up.
- Floating Floors: Removing an old floating laminate or vinyl plank floor is also relatively straightforward.
- Glue-Down Flooring: Vinyl sheet, linoleum, or glue-down carpet can be much more difficult and time-consuming to remove, often requiring extensive scraping.
- Ceramic or Porcelain Tile: This is by far the most difficult, messy, and expensive flooring to remove. It involves breaking up the tiles with a hammer or demolition tool and then grinding or scraping up the thin-set mortar underneath. The dust generated is significant, and the disposal of the heavy debris adds to the cost.
Always ask if your installation quote includes the removal and disposal of your old flooring. If it does not, you will need to budget for it separately or be prepared to do the strenuous work yourself.
Geographic Price Variations: Why Location Matters
The cost of goods and services is not uniform across the country or around the world. The price you pay for your laminate flooring project will be influenced by where you live. This is especially true for the labor component of the laminate flooring cost.
- Regional Labor Rates: A flooring installer in a major city like New York or London will have higher wages and operating costs than an installer in a small town in the American Midwest or a rural part of Southeast Asia. These differences are directly reflected in their installation rates.
- Logistics and Transportation: The cost to ship flooring materials from the manufacturer to the distribution center and then to the retailer or your home also varies by location. If you live in a remote area, you can expect to pay more for freight than someone living near a major distribution hub.
- Local Market Competition: In an area with many flooring retailers and installers, competitive pressure can help to keep prices in check. In a region with fewer options, prices may be higher.
When researching costs online, it is vital to look for data that is specific to your country and, if possible, your local region. A cost guide for Canada, such as the one from Peace of Mind Interiors (2025), may not accurately reflect prices in the United States or Russia.
Choosing a Reliable Manufacturer: The Value of Experience
In the quest for a low price, it can be tempting to opt for an unbranded, generic product. However, this can be a perilous path. The flooring industry, like any other, has leaders known for quality and innovation, and newcomers or low-cost factories that may cut corners. The manufacturer’s reputation and experience are intangible but valuable assets that factor into the long-term cost of your floor.
A company with a long history in the industry, such as an established firm with over 20 years of experience, brings a level of expertise and quality control that is hard to quantify in a per-square-foot price. A reliable manufacturer like BE Flooring invests in:
- Consistent Quality: Sourcing high-grade raw materials and maintaining strict tolerances during the manufacturing process to ensure every plank fits perfectly and performs as advertised.
- Research and Development: Pioneering innovations like more realistic EIR textures and more effective waterproof technologies.
- Robust Warranties: Standing behind their products with comprehensive warranties that protect your investment against manufacturing defects.
Choosing a product from a reputable source may have a slightly higher upfront material cost, but it provides assurance against premature failure, delamination, or fading. The cost of replacing a failed floor in just a few years far outweighs the initial savings from buying a low-quality product. This is a critical part of calculating the true, long-term laminate flooring cost.
Frequently Asked Questions About Laminate Flooring Cost
What is a realistic budget for laminate flooring in 2025?
A realistic all-in budget, including materials, underlayment, and professional installation, typically ranges from $6 to $14 per square foot. For a 200-square-foot room, this translates to a total project cost of approximately $1,200 to $2,800. This range accounts for mid-range quality materials and standard labor rates. DIY installation can reduce this cost significantly.
Is waterproof laminate flooring significantly more expensive?
Yes, waterproof laminate is more expensive than standard laminate, but the premium is often moderate. You can expect to pay roughly $1 to $3 more per square foot for a comparable waterproof product. Considering its versatility and protection against costly water damage, many homeowners find the extra investment provides excellent long-term value.
Can I install laminate flooring myself to save money?
Absolutely. DIY installation is a popular way to save on labor costs, which can account for 30-50% of the total project budget. Modern click-lock laminate systems are designed to be user-friendly. However, it requires time, patience, the right tools, and careful attention to subfloor preparation and leaving expansion gaps.
How much does underlayment add to the total cost?
Underlayment is a necessary component and typically costs between $0.30 and $1.00 per square foot. A basic foam underlayment will be at the low end of that range, while a premium acoustic or cork underlayment will be at the high end. For a 200-square-foot room, this adds $60 to $200 to your material budget.
Why are AC ratings important for determining laminate flooring cost?
The AC (Abrasion Class) rating is a direct measure of a laminate’s durability. A floor with a higher AC rating (e.g., AC4 or AC5) uses more robust materials and a thicker wear layer than a lower-rated floor (e.g., AC2 or AC3). This increased durability comes at a higher manufacturing cost, which is reflected in the retail price. Matching the AC rating to your expected foot traffic ensures you are paying for the durability you actually need.
Does the thickness of laminate flooring affect its price?
Yes, thickness is a notable factor in cost. A 12mm thick plank will cost more than an 8mm plank of the same style and brand. While thickness is not the primary indicator of scratch resistance (that is the AC rating), thicker planks feel more solid and substantial underfoot, offer better sound insulation, and are more forgiving of minor subfloor imperfections.
Final Thoughts on Budgeting Your Flooring Project
Navigating the financial aspects of a flooring renovation requires a shift in perspective. We must move beyond the simple sticker price and embrace a more holistic view of the investment. The true laminate flooring cost is not a single figure but a composite, built from the quality of the material, the artistry of its design, the labor of its installation, the necessity of its accessories, and the specific context of the project itself.
By deconstructing the cost into these constituent parts, you empower yourself to make informed decisions. You can now weigh the long-term durability of an AC4 rating against the immediate savings of an AC3. You can balance the aesthetic perfection of an EIR finish with your budget. You can make a clear-eyed choice between the savings of a DIY project and the security of a professional installation. This knowledge transforms you from a passive consumer into an active, intelligent project manager of your own home renovation. Your new floor is not just a surface to walk on; it is a foundational element of your home’s character and a tangible asset. Approaching the budget with diligence and foresight ensures that this asset is one of lasting value and enduring satisfaction.
References
3rd Gen Flooring. (2025, January 20). Understanding the average cost of flooring removal and installation in 2025. 3rd Gen Flooring. https://3rdgenflooring.us/post/understanding-the-average-cost-of-flooring-removal-and-installation-in-2025
Ansbro Aldrich Flooring. (2024, August 28). Laminate flooring vs. hardwood: A detailed comparison of cost, durability, and style. AA Flooring. https://www.aaflooring.net/blog/articles/laminate-flooring-vs-hardwood-a-detailed-comparison-of-cost-durability-and-style
Don Bailey Flooring. (2024, October 1). The ultimate guide to installing laminate flooring in high-moisture areas.
Flooring Canada. (2025). Laminate flooring.
Peace of Mind Interiors. (2025, April 29). 7 best flooring types for 2025 Canadian homes. https://www.peaceofmindinteriors.ca/blog/7-best-flooring-types-2025-guide
Rejuvenation Floor & Design. (2024, December 2). Top flooring trends 2025: Bold colors & high-tech design. https://www.rejuvenationfd.com/blog/flooring-trends-2025
Slaughterbeck Floors. (2025, May 4). Explore the top seven home flooring trends for 2025. https://www.slaughterbeckfloors.com/floorology/top-7-flooring-trends-for-homes-in-2025/