 +86 17753100577
 manager@beflooring.com


Abstract
This document presents a comprehensive exegesis on the methodology of laminate flooring installation, conceived as both a practical craft and a philosophical exercise in home-making. It moves beyond a mere procedural summary to offer a deep, analytical framework for understanding the constituent elements of a successful flooring project. The inquiry examines the critical preparatory stages, including the often-underestimated necessity of material acclimation and the meticulous leveling and purification of the subfloor. It deconstructs the installation process into seven logical and sequential stages, from the laying of the underlayment to the precise cutting and fitting of planks around architectural idiosyncrasies. The argument is advanced that the durability and aesthetic success of the final surface are contingent not upon speed, but upon a deliberate and informed engagement with each step. This guide scrutinizes the material science of laminate, the geometry of plank layout, and the ergonomic principles of the tools involved. It is designed for a global audience, from DIY novices in the United States to seasoned contractors in Europe, providing a universal grammar for achieving a professional-grade finish that enhances the lived experience of a space. The ultimate aim is to cultivate a form of practical wisdom, enabling individuals to transform their environment with competence and confidence.
Key Takeaways
- Subfloor preparation is the non-negotiable foundation for a lasting floor.
- Acclimate laminate planks in the room for at least 48 hours before starting.
- Use the correct underlayment to manage sound, moisture, and comfort.
- Our guide on how to do laminate flooring simplifies complex steps.
- Stagger plank seams by at least 12 inches for strength and beauty.
- Plan your layout carefully, especially the first and last rows.
- Finishing touches like trim and transitions define the final professional look.
Table of Contents
- Step 1: Foundational Preparations – The Unseen Bedrock of Success
- Step 2: The Subfloor – Creating a Perfect Canvas
- Step 3: Underlayment – The Unsung Hero of Your Floor
- Step 4: Planning Your Layout – The Geometry of Beauty and Strength
- Step 5: The Inaugural Rows – Setting the Precedent for Perfection
- Step 6: The Main Installation – Building Momentum Across the Room
- Step 7: The Finishing Touches – From Construction to Home
- Frequently Asked Questions (FAQ)
- Conclusión
- References
Step 1: Foundational Preparations – The Unseen Bedrock of Success
To embark on the project of laying a new floor is to engage in an act of profound transformation. It is not merely the replacement of a surface but the re-imagining of a space’s character, its feel, its very soul. Before a single plank is laid, however, there is a period of quiet, deliberate preparation. This initial phase, often rushed or overlooked in a surge of enthusiasm, is analogous to the foundational premises of a sound philosophical argument. Without a solid, well-considered base, the entire structure, no matter how aesthetically pleasing, is vulnerable to failure. Here, we will explore the essential preparatory actions that form the bedrock of a successful and enduring laminate flooring installation.
The Philosophical and Practical Importance of Preparation
Why do we prepare? On a practical level, the answer is self-evident: to avoid mistakes, to ensure efficiency, to achieve a better result. Yet, on a deeper level, preparation is an exercise in foresight and respect. It is a dialogue between our intentions and the physical reality of the space we seek to alter. Rushing this stage is an act of arrogance, an assumption that our will can be imposed upon the world without consequence. The floor may look acceptable for a month, or even a year, but the subtle rebellions of an unprepared subfloor—the squeaks, the gaps, the buckling—will eventually voice their protest. A truly successful DIY flooring project is one where the installer has listened to the room, understood its conditions, and responded with thoughtful preparation. It is an act of co-creation, not conquest. This empathetic approach to the task at hand is central to the entire process of learning how to do laminate flooring correctly. It separates the artisan from the laborer.
A Dialogue with Your Space: Evaluating the Existing Floor
Your first task is to remove the existing floor covering. This is not just demolition; it is an archeological dig of sorts, revealing the history of the room and the state of its foundational layer, the subfloor. Whether you are pulling up old carpet, peeling back vinyl, or prying up tile, proceed with care. Your goal is to expose the subfloor with minimal damage. As you work, observe. Is the old carpet damp underneath? This could signal a moisture problem that must be addressed. Are the old tiles cracked? This might indicate movement or an unevenness in the subfloor. Each observation is a clue. Once the old flooring is gone, remove any lingering staples, tack strips, or adhesive residue. The subfloor must be a blank slate. Following this, you must remove the baseboards or skirting boards from the perimeter of the room. Do this gently, using a putty knife to protect the wall from the pry bar. Number the back of each piece and note its location on a diagram of the room. This simple act of organization will be a gift to your future self when it comes time to reinstall them. This careful deconstruction is a vital first lesson in how to do laminate flooring; it teaches you to look beyond the surface.
The Science of Acclimation: Why Your Laminate Needs to Rest
Perhaps the single most critical, and most frequently ignored, preparatory step is acclimation. As explained by the flooring experts at Barefoot Flooring, this process is essential. Laminate flooring, though a synthetic product, has a core typically made of high-density fiberboard (HDF), a wood composite. Like all wood-based materials, it is hygroscopic, meaning it absorbs and releases moisture from the air, causing it to expand and contract. The flooring you receive has been living in a warehouse, then on a truck—environments with different temperature and humidity levels than your home. To lay the planks immediately upon arrival is to invite disaster. Imagine forcing two individuals who have never met to immediately collaborate on a complex task; there will be friction and misunderstanding. The planks need time to adjust to their new environment. The process is simple: bring the unopened boxes of laminate into the room where they will be installed. Lay them flat on the floor, away from direct sunlight or heating vents. Do not stack them more than a few boxes high, to allow for air circulation. And then, you wait. For how long? A minimum of 48 to 72 hours is the standard recommendation. During this time, the planks will physically adjust to the ambient temperature and humidity of your space. This patient waiting period ensures that the majority of expansion or contraction happens before the planks are locked together, preventing future problems like buckling (if they expand after installation) or gapping (if they contract). This is a non-negotiable part of how to do laminate flooring.
Gathering Your Arsenal: Tools and Materials for the Task
A craftsperson is defined not only by their skill but also by their tools. Attempting a laminate installation with inadequate or incorrect equipment is a recipe for frustration and a compromised finish. Before you begin, gather everything you will need. This act of marshaling your resources focuses the mind and ensures that once you begin the installation, your workflow will be smooth and uninterrupted. The search for a misplaced tool can break your rhythm and lead to careless errors. Let us create a clear inventory of the necessary implements. Consider this table a foundational checklist for your project.
| Category | Artículo | Purpose and Rationale |
|---|---|---|
| Measurement & Marking | Tape Measure | For all measurements of the room and individual planks. An indispensable tool. |
| Pencil | For marking cut lines on planks. Keep it sharp for precision. | |
| Combination Square | Ensures perfectly square cuts and helps transfer measurements accurately. | |
| Cutting | Miter Saw or Circular Saw | For making straight, clean crosscuts on planks. A miter saw offers the most precision. |
| Jigsaw or Coping Saw | For intricate cuts around pipes, door jambs, and other irregular shapes. | |
| Utility Knife | For cutting underlayment and scoring the back of planks for certain types of cuts. | |
| Instalación | Tapping Block | A specialized block used with a hammer to gently tap planks together without damaging the locking mechanism. Never hit the plank directly. |
| Pull Bar | A metal bar used to pull the last plank in a row tight against the previous one, especially near walls where a tapping block won’t fit. | |
| Separadores | Small wedges (usually 1/4″ or 3/8″, approx. 6-10mm) placed between the flooring and the walls to maintain the necessary expansion gap. | |
| Rubber Mallet or Hammer | Used with the tapping block and pull bar to apply gentle, controlled force. | |
| Preparation | Pry Bar & Putty Knife | For removing baseboards and old flooring materials without damaging walls. |
| Floor Scraper | For removing old adhesive or stubborn debris from the subfloor. | |
| Shop Vacuum | For thoroughly cleaning the subfloor before laying the underlayment. A broom is not sufficient. | |
| Level (at least 6 ft / 2m) | For checking the flatness of the subfloor. A shorter level can be misleading. | |
| Safety | Safety Glasses | To protect your eyes from sawdust and debris. Non-negotiable. |
| Knee Pads | You will spend hours on your knees. This is an investment in your physical well-being. | |
| Dust Mask | To prevent inhalation of fine sawdust, especially when cutting HDF. |
In addition to these tools, you will need your chosen laminate flooring, the appropriate underlayment, and a moisture barrier if required for your subfloor type. Acquiring high-quality floor tool accessories can make a significant difference in the ease and quality of the installation. Having these items on hand before you begin transforms the project from a series of stressful interruptions into a fluid, focused process.
The Subfloor – Creating a Perfect Canvas
The subfloor is the protagonist of our story’s unseen first act. It is the canvas upon which you will paint your masterpiece. Any flaws, imperfections, or unresolved issues in this foundational layer will inevitably manifest on the surface, like a troubled conscience revealing itself in a pained expression. The laminate planks, with their precise locking mechanisms, are unforgiving of an uneven or unstable base. They demand a surface that is flat, clean, and dry. Achieving this state is not merely a suggestion; it is a structural imperative for a successful laminate installation. This phase of the work requires patience, attention to detail, and an unwillingness to compromise.
The Anatomy of a Subfloor: Wood, Concrete, and Beyond
Subfloors are generally of two primary types: wood-based (plywood or OSB – Oriented Strand Board) or mineral-based (concrete slab). Each has its own character, its own potential problems, and requires a slightly different approach. A wood subfloor, common in multi-story homes, can suffer from loose boards, protruding nail or screw heads, and warping due to moisture. A concrete subfloor, typical in basements or ground-floor construction, presents challenges of moisture transmission and can have cracks, spalling, or unevenness from the original pour. It is your task to diagnose the condition of your specific subfloor. Walk across every square foot of it. Do you feel any soft or spongy spots on a wood subfloor? Do you hear squeaks? These are signs that boards may need to be re-secured to the joists below with screws. On a concrete floor, look for discoloration, powdery residue (efflorescence), or dampness, all of which point to moisture issues. Understanding the nature of your substrate is the first step in preparing it properly, a key component in the broader understanding of how to do laminate flooring.
The Pursuit of Flatness: Identifying and Correcting Imperfections
Laminate flooring requires a remarkably flat surface. The typical manufacturer’s tolerance is a variation of no more than 3/16 of an inch over a 10-foot span (or about 5mm over 3 meters). How does one verify this? With a long, straight edge—a 6- or 8-foot level is ideal. Lay the level on the subfloor in multiple locations and directions across the room. Look for any gaps between the bottom of the level and the floor. Slide a stack of coins or a ruler into any gaps to measure their depth. Also, check for high spots by trying to rock the level back and forth. Mark all the low spots and high spots you find with your pencil. What do you do about these imperfections? This is where the real work begins. The solution depends on the subfloor type and the nature of the problem, as detailed in the table below.
| Imperfection | On Wood Subfloor | On Concrete Subfloor | Rationale |
|---|---|---|---|
| High Spots (Bumps, Ridges) | Use a belt sander or a floor sander to gradually sand down the high area. Check frequently with your straight edge. | Use a concrete grinder (rentable) for significant high spots. For minor bumps, a large masonry chisel and hammer can work. | Creating a flat plane is essential. High spots create pivot points under the laminate, leading to stress on the joints and eventual failure. |
| Low Spots (Dips, Valleys) | Use a cement-based self-leveling compound. Prime the wood first according to the compound’s instructions to ensure proper adhesion. | Use a cement-based self-leveling compound. The compound is designed to flow into low areas and create a perfectly flat, smooth surface. | Filling low spots prevents the laminate from flexing downwards when walked upon, which would cause a “bouncy” feel and strain the locking system. |
| Cracks | Not typically an issue unless they indicate structural problems. Fill wider gaps between plywood sheets with a patching compound. | Fill non-structural hairline cracks with a concrete crack filler or patching compound to create a smooth surface. | While minor cracks may not be a structural threat, they can telegraph through the underlayment and create noise or slight unevenness. |
| Squeaks / Movement | Drive long screws through the subfloor and into the floor joists below to pull the sheathing tight and eliminate movement. | Not applicable. Squeaks are a phenomenon of wood-on-wood or wood-on-nail movement. | Movement in the subfloor is the primary cause of squeaks and will translate directly into an unstable-feeling finished floor. |
This process of leveling is arduous. It may seem disproportionate to the task of simply laying a floor. But it is here, in the unseen depths, that the longevity of your project is determined. To skip this step is to build a house upon the sand. A proper DIY flooring project respects the physics of the materials, and flatness is a physical requirement.
The Imperative of Cleanliness: A Meticulous Sweep
Once the subfloor is flat and sound, it must be made immaculately clean. This is not a task for a simple broom. Any small pebble, wood chip, or clump of drywall dust left on the subfloor becomes a potential pressure point under your new flooring. Over time, walking on the plank above this debris can cause an audible crunch, a visible pimple on the surface, or even damage to the plank itself. The tool for this job is a shop vacuum. Methodically vacuum the entire surface, paying special attention to the corners and edges where debris loves to hide. Use a crevice tool to ensure the junction between the floor and the wall is perfectly clean. After vacuuming, some professionals even go over the floor with a slightly damp tack cloth to pick up the finest dust particles. Your goal is a surface clean enough to eat off of, though we do not recommend taking that literally. This fanatical cleanliness is a hallmark of professional work and a critical detail in how to do laminate flooring to a high standard.
Moisture – The Silent Adversary
Water is the universal solvent and the nemesis of most flooring materials, especially those with a wood-based core. An unmanaged moisture problem will cause laminate to swell, warp, buckle, and grow mold. It is an enemy that must be confronted before a single plank is installed. How do you know if you have a moisture problem? For concrete subfloors, especially those that are below grade (in a basement) or on-grade, a moisture test is not optional; it is mandatory. A simple and effective method is the plastic sheet test. Tape a 2×2 foot (or 60×60 cm) square of clear plastic sheeting to the concrete floor, sealing all four edges with heavy-duty tape. Wait 24-48 hours. If you see condensation droplets on the underside of the plastic or the concrete appears darker, you have a moisture issue. For more precise readings, professionals use a calcium chloride test or an electronic moisture meter. If excessive moisture is present, it must be resolved before proceeding. This might involve improving drainage around the foundation, sealing the concrete with a specialized epoxy sealant, or addressing plumbing leaks. For any concrete subfloor, and for wood subfloors over a crawl space, a moisture barrier (also called a vapor barrier) is required. This is typically a 6-mil polyethylene sheeting laid over the entire subfloor with seams overlapped and taped. Many modern underlayments now come with a moisture barrier integrated, simplifying the installation process. This vigilance against moisture is a fundamental principle in any quality laminate flooring guide.
Underlayment – The Unsung Hero of Your Floor
Between the meticulously prepared subfloor and the beautiful laminate planks lies a thin, often overlooked layer: the underlayment. It is tempting to view this material as a minor detail, an incidental accessory in the grand project of flooring. This would be a profound misjudgment. The underlayment is the essential intermediary, the diplomat that negotiates the relationship between the rigid subfloor and the “floating” laminate surface. It performs a multitude of critical functions that contribute to the floor’s daily performance, its acoustic properties, its feel underfoot, and its overall longevity. Neglecting the quality or proper installation of the underlayment is to undermine the entire system. It is the unsung hero that makes the visible heroes—the planks—look and perform their best.
Understanding the Role of Underlayment
What, precisely, does this thin sheet of foam, felt, or cork do? Its functions are manifold. First, it provides a degree of cushioning. This not only makes the floor more comfortable to walk on but also helps to absorb minor, residual imperfections in the subfloor that even the most diligent preparation might have missed. It smooths over the micro-topography of the subfloor, providing a consistently smooth surface for the laminate. Second, it is a crucial acoustic barrier. Without underlayment, a laminate floor can be noisy, producing a hollow, “clacky” sound when walked upon. The underlayment dampens this sound transmission, both within the room and to the floor below—a matter of great importance in apartments, condominiums, or second-story installations. Some premium underlayments are specifically designed for superior sound reduction. Third, it acts as a thermal break. It provides a small amount of insulation, which can make the floor feel slightly warmer underfoot, particularly over a cold concrete slab. Finally, as discussed, many underlayments incorporate a vapor barrier, providing that essential protection against moisture from below. A high-quality suelo laminado impermeable system is only as good as the moisture protection beneath it.
Selecting the Right Type for Your Needs
Underlayments are not a one-size-fits-all product. The choice depends on your subfloor type, your specific needs, and the laminate flooring itself. Let’s examine the primary categories. Standard Foam Underlayment is the most basic and affordable option. It is a thin polyethylene foam that provides minimal cushioning and sound dampening. It is suitable for budget projects over a wood subfloor where acoustics are not a major concern. Combination Foam Underlayment, or “2-in-1,” is a step up. It’s a standard foam underlayment with a plastic moisture-barrier film attached. This is a good choice for installations over concrete slabs, as it combines two steps into one. A “3-in-1” underlayment adds an adhesive strip to the combination model, making it easier to seal the seams between rows. Felt Underlayment, made from recycled fibers, is a premium choice. It is denser than foam, offering superior sound absorption and a more substantial feel underfoot. It is an excellent choice for those seeking to minimize noise. Cork Underlayment is another high-end option, prized for its natural, sustainable properties. It is the best choice for sound reduction and also has natural antimicrobial properties, resisting mold and mildew. Some laminate flooring products now come with the underlayment pre-attached to the back of each plank. This can speed up the installation process significantly. However, you must still use a separate 6-mil poly moisture barrier if installing over concrete. Always check the flooring manufacturer’s recommendations. They will specify the type and thickness of underlayment compatible with their product. Using an underlayment that is too thick, for example, can cause the planks to flex too much at the joints, leading to damage. This is a crucial detail in learning how to do laminate flooring properly.
The Art of a Flawless Underlayment Installation
Laying the underlayment is a relatively simple task, but precision is still key. Start at one wall and unroll the first row. If your underlayment has an integrated moisture barrier, the plastic side should face down against the subfloor. The edges of the underlayment should be laid so they butt up against each other perfectly; they should not overlap, as this would create a ridge under the flooring. The only exception is if the underlayment has a built-in overlapping flap with an adhesive strip, which is designed to seal the seam. Use a utility knife and a straight edge for clean, straight cuts at the end of rows and around obstacles. Secure the seams between rows with the manufacturer’s recommended tape (often a simple packing tape will suffice, but specialty tapes are available). The goal is to create a single, continuous, sealed sheet covering the entire subfloor. It should run up the walls an inch or two (a few centimeters); this excess will be trimmed away after the flooring is installed. A properly installed underlayment provides a quiet, stable, and protected base, setting the stage for the main event of the laminate installation.
Planning Your Layout – The Geometry of Beauty and Strength
With the foundation prepared and the underlayment in place, the temptation to begin clicking planks together is immense. But we must pause once more. The next phase is one of pure thought and planning. It is the architectural stage of our project, where we decide on the geometry of the floor. How the planks are oriented, where the first row begins, and how the joints are staggered are not arbitrary choices. They are decisions that have profound implications for the structural integrity of the floor and its ultimate aesthetic appeal. A well-planned layout creates a sense of harmony and visual flow, leading the eye through the space. A poorly planned layout can look chaotic, unbalanced, and amateurish. This is the intellectual core of the process, where foresight and a bit of simple mathematics pave the way for a beautiful outcome.
Establishing Your Starting Wall: A Critical Decision
The general rule of thumb is to lay the laminate planks parallel to the longest wall of the room. This typically creates the most pleasing visual effect, making the room appear larger and more cohesive. Another common convention is to run the planks in the same direction as the main source of natural light (i.e., perpendicular to the primary window). This orientation tends to hide the seams between the planks, as the light does not cast shadows across them. In most rooms, these two guidelines will point to the same starting wall. But what if they conflict? What if the longest wall is not the window wall? Here, aesthetic judgment comes into play. There is no single “correct” answer. Stand in the main entryway to the room and visualize both options. Which one feels more natural? Which one creates a better sense of flow into adjacent spaces? In most cases, running parallel to the longest wall is the prevailing choice. Once you have chosen your direction, your starting wall will be the one you begin laying planks against. It is almost always best to work from left to right across the room. Before committing, however, there is one more crucial calculation to make. Measure the width of the room (perpendicular to the direction you will be laying the planks) and divide it by the width of a single plank. This will tell you how wide your final row will be. If the calculation shows that your last row will be a very narrow, difficult-to-cut sliver (less than 2 inches or 5 cm wide), you should adjust your starting point. The solution is to “rip cut” (cut lengthwise) the planks of your first row, making them narrower. By taking some width off the first row, you add that same amount of width to the last row, ensuring both are a respectable and manageable size. This foresight prevents a common DIY flooring error and is a testament to a well-thought-out plan.
The Staggering Principle: More Than Just Aesthetics
Laminate flooring should never be installed with the short end-seams aligned, creating what is known as an “H-joint.” This is not only visually jarring, reminiscent of a simple brick pattern, but it is also structurally weak. The strength of a floating floor comes from the distribution of stress across a wide, interconnected field of planks. Aligning the seams concentrates the stress points, making the floor vulnerable to separation. The solution is to stagger the seams from one row to the next in a random-seeming pattern. The cardinal rule is that the end-seam of a plank in one row should be at least 12 inches (30 cm) away from the nearest end-seam in the adjacent rows. To achieve this, you will begin each new row with a plank of a different length. Here is a common and effective method: after you cut the last plank to fit at the end of your first row, use the leftover piece (the “offcut”) to start your second row, provided it is at least 12 inches long. The offcut from the end of the second row starts the third, and so on. This method naturally creates a random stagger, reduces waste, and is an efficient part of the workflow of how to do laminate flooring. It creates a visually dynamic and structurally sound floor. You should never have a discernible “step” pattern in your seams; the goal is a pleasing randomness that mimics the natural irregularity of a real hardwood floor.
Navigating the Architectural Complexities: Doorways and Obstacles
Few rooms are simple, perfect rectangles. Most have doorways, closets, vents, or perhaps even support columns or fireplaces. Planning how to handle these interruptions is essential. The most common and challenging obstacle is a doorway. You will need to cut the planks to fit around the door jambs and casing. The most professional-looking method is to “undercut” the door jamb. To do this, take a scrap piece of laminate and the attached underlayment, lay it flat on the subfloor next to the jamb, and use a handsaw or an oscillating multi-tool to cut the bottom of the jamb and casing away. The new flooring will then slide neatly underneath the jamb for a clean, seamless finish. This is far superior to attempting a difficult contour cut around the jamb. For other obstacles, like pipes or vents, you will need to use your jigsaw. Measure carefully where the obstacle falls on a plank. Drill a starter hole, then use the jigsaw to cut out the required shape. For pipes, you can often drill a hole slightly larger than the pipe’s diameter, then make a straight cut from the edge of the plank to the hole. The plank can then be installed, and the small cut line can be hidden with glue and a matching color putty. Planning these complex cuts in advance, perhaps even making a cardboard template first, reduces stress and minimizes wasted planks. This level of detailed planning is what distinguishes a masterful laminate installation from a mediocre one.
Have any other questions? Póngase en contacto con nosotros now!
The Inaugural Rows – Setting the Precedent for Perfection
The moment of truth has arrived. The room is prepared, the plan is set, and the tools are at hand. It is time to lay the first planks. This initial stage of the installation is the most critical in terms of precision. The first few rows establish the alignment for the entire floor. Any error here, no matter how small, will be magnified as you work your way across the room, resulting in crooked lines and unsightly gaps. This is a time for slow, deliberate action. Think of a master calligrapher making the first stroke of a brush; it is done with immense focus, as it sets the tone and direction for all that follows. Your first three rows are the foundation of your visible floor, and they must be perfect.
The First Plank: A Moment of Truth
Begin in your chosen starting corner, typically the left-hand corner of your longest wall. Take your first plank. If you have determined that your first row needs to be rip-cut to a narrower width, this should already be done. The tongue side of the plank (the smaller, protruding edge) should face the starting wall. The groove side (the larger, indented edge) should face out into the room. This is crucial because it allows you to tap subsequent planks into the exposed groove. Now, place the required expansion spacers against the starting wall and the side wall. These spacers, typically 1/4 inch to 3/8 inch (6-10 mm), create the vital expansion gap. This gap allows the entire floor to expand and contract with changes in humidity without buckling. It will be hidden later by the baseboards. Place the first plank firmly against these spacers. You are now officially underway in the practical application of how to do laminate flooring.
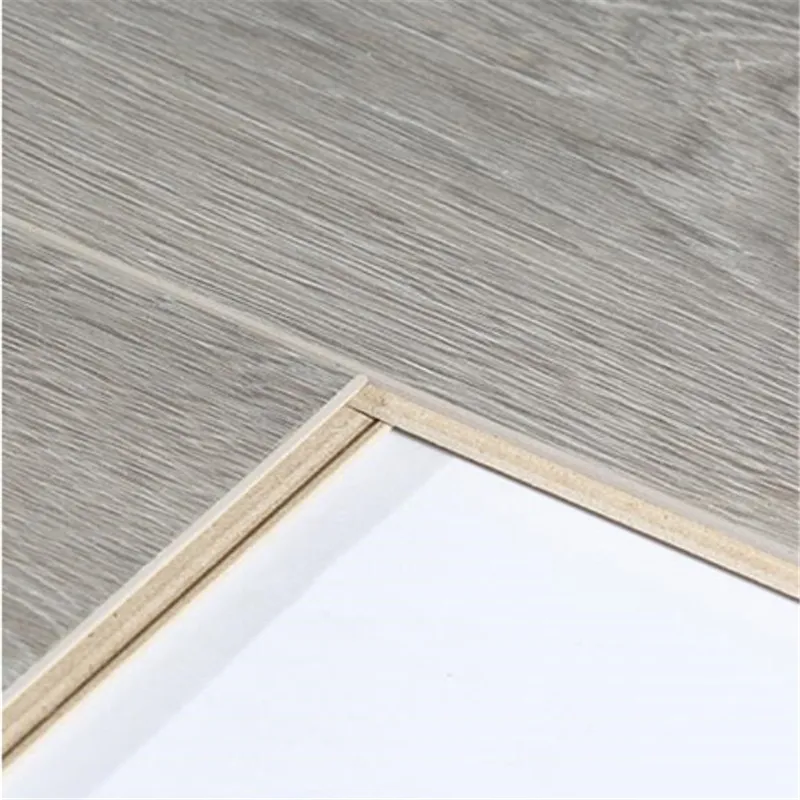
Mastering the Click-Lock System
Laminate flooring utilizes a brilliant and robust “click-lock” or “tongue-and-groove” system. Understanding how to engage this mechanism properly is the core mechanical skill of the installation. Take your second plank for the first row. Approach the first plank at a slight angle (around 20-30 degrees). Insert the tongue on the short end of the second plank into the groove on the short end of the first plank. Lower the second plank down to the floor. It should click into place, forming a tight, seamless connection. There should be no visible gap between the two planks. If the connection isn’t perfect, you can gently tap the joint together. To do this, insert your tapping block against the exposed end of the second plank and give it a few gentle taps with your mallet. Never strike the plank directly with a hammer, as you will certainly damage the edge. Continue this process, adding planks end-to-end, until you reach the far wall. Each connection should be firm and seamless. This process of angle, lower, and click is the fundamental rhythm of a laminate installation.
Completing the First Three Rows: The Foundation of Your Grid
The last plank in your first row will almost certainly need to be cut. To measure it, lay a full plank on top of the last installed plank, with its tongue against the wall (remember to use a spacer). Mark where it overlaps the plank below it. This mark is your cut line. Take the plank to your saw and make the cut. Install this final piece. Now, as planned in the previous step, use the offcut from this plank to start your second row, as long as it meets the minimum length requirement (e.g., 12 inches/30 cm). This begins your stagger pattern. To install the second row, place the long tongue edge of the new plank into the long groove edge of the first row, again at a slight angle. Lower the plank and engage the long seam. Then, slide it down until its short end is close to the previous plank in its own row. To lock the short end, you will need your tapping block and mallet. Place the block against the exposed short end of the plank you are installing and tap it firmly until the short-end joint closes completely. Continue across the room, installing the second row. Repeat the entire process for the third row, again starting with the offcut from the end of the second row. Once you have three full rows installed, stop and inspect your work. Are the lines perfectly straight? Use a long straightedge or a chalk line to verify. Are all the seams tight, both on the long and short ends? If there are any issues, now is the time to fix them. These first three rows form a stable, heavy unit that is unlikely to shift. They are your reference grid for the rest of the room. Their perfection is paramount. This meticulous start is a cornerstone of any high-quality laminate flooring guide.
The Main Installation – Building Momentum Across the Room
With the first three rows laid straight and true, you have passed the most nerve-wracking phase of the installation. You have established your guide and your rhythm. Now, the project transitions from a game of inches to a process of steady, satisfying progress. The middle of the floor is where you build momentum, covering large areas relatively quickly. The repetitive nature of the work can be meditative, a physical mantra of measure, cut, click, and tap. However, this is not a time for complacency. Attention to detail remains crucial, especially as you encounter the unique challenges and obstacles that every room presents. Maintaining the integrity of your stagger pattern and the tightness of your seams is a constant discipline that pays dividends in the final appearance of your floor.
The Rhythm of Installation: Measure, Cut, Click, Tap
The process for each subsequent row is a repetition of the skills you have already mastered. Start each new row with the offcut from the previous one. Engage the long edge of the plank into the groove of the row before it. Slide it into position. Use your tapping block and mallet to lock the short end joint. Continue across the row. When you reach the end, measure and cut the final piece. Use the offcut to start the next row. This cycle becomes the heartbeat of the project. As you work, it is wise to pull planks from several different boxes simultaneously. Even within the same manufacturing run, there can be slight variations in color or pattern. Mixing the planks ensures that these minor differences are blended randomly across the floor, resulting in a more natural and harmonious appearance. This is a subtle but important technique that separates professional-looking results from amateur ones. Keep your expansion spacers in place along the walls as you go. Periodically, step back and look at your work from a distance. Ensure your stagger pattern remains random and that no undesirable “step” patterns are emerging. This continuous self-correction is part of the craft of a good DIY flooring project.
Working Around Obstacles with Precision and Finesse
This is where your jigsaw becomes your most valuable partner. As you reach obstacles like radiator pipes, support posts, or complex corners, you must pause your rhythm and engage in some custom craftsmanship. Let’s return to the example of a door jamb that you have already undercut. As your flooring reaches the doorway, you simply slide the plank underneath the cut jamb. This may require some careful maneuvering and perhaps the use of the pull bar to snug it into place, but the result is a clean, integrated finish that looks truly professional. For something like a pair of radiator pipes, you will need to perform a more complex cut. Position the plank as if you were going to install it, and carefully mark the exact location and diameter of both pipes on the plank’s surface. Remove the plank and drill holes at the marked locations, making the holes slightly larger than the pipes’ diameter to allow for expansion. Then, you must make a cut that allows you to fit the plank around the pipes. A common method is to draw two angled lines from the center of each hole back to the edge of the plank, creating a small wedge-shaped piece. You cut out this wedge, install the main part of the plank, and then glue the small wedge back into place behind the pipes. The small seams can be covered by pipe escutcheons or rings. For every obstacle, the principle is the same: measure with extreme care, think through the cuts before you make them, and use the right tool for the job. Making a cardboard template first can save a valuable plank from a costly mis-cut. This problem-solving aspect is a challenging but rewarding part of learning how to do laminate flooring.
The Final Row: A Test of Patience and Skill
As you approach the far wall, you will face your final challenge: the last row. It is almost a certainty that a full-width plank will not fit. This row will require a “rip cut”—a cut along its length. Measuring for this cut requires care. Place a full plank directly on top of the last installed row. Then, take another plank and place it on top of that, with its tongue edge touching the wall (remember to use a spacer). Now, use the edge of this top plank as a guide to draw a line on the plank beneath it. This line represents your cut line. It perfectly traces the contour of the wall, accounting for any slight waviness. Take the marked plank (the middle one in your sandwich) to your saw and carefully make the rip cut. This final, custom-fitted piece must then be installed. Because you are so close to the wall, you will not be able to use your tapping block. This is where the pull bar earns its keep. Engage the long joint of the plank, then hook the pull bar over the cut edge of the plank against the wall. Gently tap the other end of the pull bar with your mallet to pull the final row tight, closing the last seam. It is a moment of great satisfaction, bringing the main body of the installation to a close. As a leading manufacturer with over two decades of experience, we at BEFLOORING understand that these final details are what define a project’s success.
The Finishing Touches – From Construction to Home
The field of planks is laid, the last piece is snugly in place. A great sense of accomplishment is warranted, but the work is not yet complete. The project is currently in a transitional state—no longer a construction site, but not yet a finished room. The final steps, collectively known as the finishing touches, are what bridge this gap. They are the details that conceal the mechanics of the installation, cover the expansion gaps, and integrate the new floor seamlessly into the home’s architecture. This final stage transforms your hard work into a polished, professional, and livable space. It is akin to framing a painting or binding a book; it completes the work and presents it to the world in its best possible light.
Reinstalling Baseboards and Installing Transitions
Your first task is to carefully remove all the expansion spacers from around the perimeter of the room. Now you can address the expansion gap you so painstakingly maintained. This is the purpose of baseboards (or skirtings). Retrieve the numbered pieces you carefully removed at the beginning of the project. Reinstall them in their original locations, nailing them to the wall, not to the new floor. The baseboard should sit just slightly above the laminate, or rest gently on it, completely concealing the gap while still allowing the floor to move freely underneath. If your old baseboards are damaged or you simply want a new look, installing new ones is a straightforward task. Next, consider the transitions. Wherever your new laminate floor meets another type of flooring—be it carpet in a hallway, tile in a bathroom, or wood in an adjacent room—you must install a transition strip. These strips provide a safe and aesthetically pleasing bridge between the two surfaces. There are several types. A T-molding is used to join two floors of the same height. A reducer strip transitions from the laminate down to a lower floor, like vinyl. An end cap or square nose is used where the laminate meets a sliding glass door track, a fireplace hearth, or a step down. These transition pieces typically come with a metal track that is screwed to the subfloor; the visible top piece then snaps into this track. Installing these finishing pieces correctly is the final test in your education on how to do laminate flooring.
The First Cleaning: A Gentle Welcome
After all the cutting, tapping, and installing, your new floor will be covered in a fine layer of sawdust and footprints. It needs its inaugural cleaning. Do not rush to use a wet mop and a bucket of water. For this first cleaning, and for most routine cleaning, dry methods are best. Start by sweeping the floor with a soft-bristle broom or, even better, vacuuming it with a hard floor attachment. Do not use a vacuum with a beater bar or rotating brush, as this can scratch the surface. Once all the loose debris is gone, you can use a microfiber dust mop to pick up any remaining fine dust. If there are any smudges or marks, you can use a laminate-specific floor cleaner sprayed lightly onto a microfiber cloth to spot-clean the area. Never pour liquid directly onto the floor. This first cleaning is a satisfying ritual, wiping away the evidence of construction and revealing the clean, beautiful surface you have created. It’s the moment the room truly begins to feel new.
A Lifetime of Care: Maintaining Your New Laminate Floor
Your beautiful new floor is installed, but the relationship with it has just begun. Proper care and maintenance will ensure it looks great for years to come. Laminate flooring is remarkably durable, but it is not indestructible. Place high-quality doormats at all exterior entrances to trap grit and moisture before they reach the floor. Apply felt pads to the bottom of all furniture legs to prevent scratches when chairs and tables are moved. For routine cleaning, the dry methods mentioned above—sweeping, vacuuming (with a hard floor head), and microfiber dusting—are your best friends. For deeper cleaning, use a pH-neutral cleaner specifically formulated for laminate floors, and always apply it with a microfiber mop that is merely damp, not wet. The key is to use as little liquid as possible. Wipe up any spills immediately. While many modern products, such as high-quality waterproof laminate flooring, offer superior resistance to moisture, it is never a good idea to let liquids sit on the surface. Following these simple maintenance rules will protect your investment and allow you to enjoy the fruits of your labor for its full lifespan. As noted by Flooring Studio, proper maintenance is key, and many quality floors come with long warranties that depend on it.
Frequently Asked Questions (FAQ)
1. Can I install laminate flooring over my existing floor?
It depends on the existing floor. Laminate can often be installed over a single layer of clean, flat, and fully adhered vinyl, linoleum, or ceramic tile. However, it should never be installed over carpet, as the surface is too soft and unstable. Installing over any existing floor requires that the subfloor beneath is structurally sound and that the total height will not interfere with doors or appliances. The most reliable method, which ensures you can properly inspect and prepare the subfloor, is to remove the old flooring first.
2. What is the most common mistake people make when they learn how to do laminate flooring?
The most common and costly mistake is inadequate subfloor preparation. This includes failing to properly level the subfloor (correcting high and low spots) and, most critically, failing to acclimate the new laminate planks to the room’s environment for at least 48 hours before installation. Skipping these steps can lead to gapping, buckling, and a noisy, unstable floor over time.
3. Which direction should I lay the planks?
The standard convention is to lay the planks parallel to the longest wall of the room. This generally creates the most visually appealing and spacious look. Another popular approach is to run the planks in the same direction as the main source of natural light (perpendicular to the main window), which helps to hide the seams between planks. If these two directions conflict, choose the one that provides the best visual flow from the room’s main entrance.
4. Do I really need an expansion gap around the entire room?
Yes, absolutely. The expansion gap (typically 1/4″ to 3/8″ or 6-10mm) is non-negotiable. Laminate flooring is a “floating floor,” meaning the entire surface expands and contracts as a single unit with changes in temperature and humidity. Without this gap around the perimeter, the expanding floor would press against the walls, causing it to buckle and potentially damage the locking system. The gap is completely hidden by baseboards and transition strips after installation.
5. How do I clean and maintain my new laminate floor?
Maintenance is relatively simple. For daily cleaning, use a soft-bristle broom, a microfiber dust mop, or a vacuum with a hard floor attachment (no beater bar). For heavier cleaning, use a laminate-specific, pH-neutral cleaner sprayed lightly onto a microfiber mop—the mop should be damp, not wet. Never flood the floor with water or use wax, polish, or abrasive cleaners. Wipe up spills immediately and use felt pads under furniture to prevent scratches.
6. What is the difference between laminate flooring and vinyl flooring?
Though they can look similar, their core composition is different. Laminate flooring has a core made of high-density fiberboard (HDF), a wood composite, making it feel more rigid and substantial underfoot. Vinyl flooring (like LVP/LVT) has a core made of solid vinyl or a stone-plastic composite (SPC), making it 100% waterproof. While modern high-quality waterproof laminate flooring offers excellent water resistance on the surface, vinyl is inherently waterproof through its entire thickness.
7. How much extra flooring should I buy?
It is standard practice to purchase 10% more flooring than your calculated square footage. This extra material, known as the “waste factor,” accounts for mis-cuts, damaged planks, and the pieces that are cut away when fitting planks at the end of rows or around obstacles. For complex rooms with many angles or a diagonal layout, increasing this to 15% is a wise precaution.
Conclusión
The journey of installing a laminate floor is a profound undertaking that extends far beyond the simple act of covering a surface. It is an intricate dance of preparation, precision, and patience. As we have seen, the path to a flawless finish is paved not with haste, but with a deep, almost philosophical respect for each stage of the process. From the quiet contemplation of acclimation and the meticulous purification of the subfloor, to the geometric planning of the layout and the rhythmic execution of the installation, every step is a necessary antecedent to the next. The final result—a beautiful, durable, and stable floor—is not an accident but the logical conclusion of a well-executed argument. It is a testament to the idea that the quality of what is seen is determined by the integrity of what is unseen. By embracing the principles outlined in this comprehensive laminate flooring guide, from understanding the material’s nature to mastering the tools of the trade, one transcends the role of a mere laborer and becomes a craftsperson. You are not just laying planks; you are creating the very stage upon which the life of the home will unfold, a foundation that is both physically sound and aesthetically enriching. This process, when undertaken with care, offers not just a new floor, but a lasting sense of accomplishment and a deeper connection to the spaces we inhabit.
References
- Ansbro Aldrich Flooring. (2024). Laminate flooring vs. hardwood: A detailed comparison of cost, durability, and style. AA Flooring.
- Barefoot Flooring. (2024). Some of the most common mistakes when laying laminate flooring: Make installation easy.
- 50 Floor. (2025). Laminate flooring buying guide.
- Flooring Studio. (2025). What is laminate flooring?.
- Banks, R. (2022). The ultimate guide for laminate flooring. Word of Mouth Floors.